Mfr Part # 3346
I2S 3W STEREO SPEAKER AMP BONNET
Adafruit Industries LLC
License: See Original Project Single Board Computers Amplifiers Raspberry Pi SBC
Guide by Tim C
This guide documents experimentation with locally running edge AI models on the Raspberry Pi 5. Two basic projects are included that demonstrate how to use Python to combine local LLMs with text to speech models.
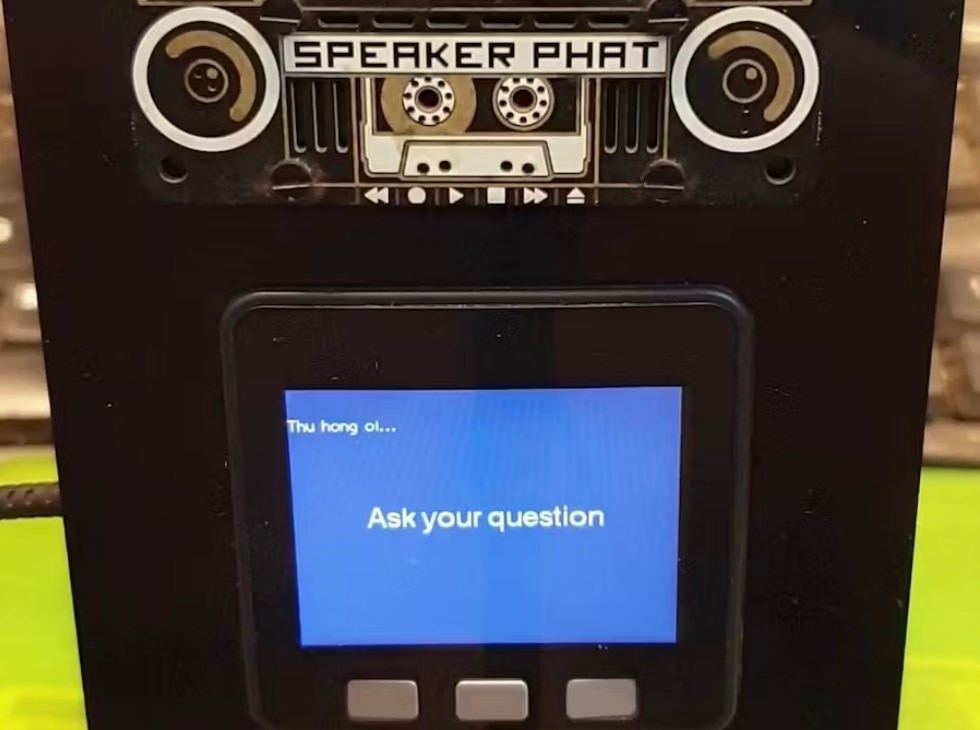
The models used, SmolLM3 and Piper TTS, are both multi-lingual. The projects focus on translation tasks in order to experiment with these capabilities. The models aren't perfect and do sometimes go a little off the rails. The capabilities that they unlock for Raspberry Pi 5 based projects are impressive none-the-less. Here is a video demonstrating the project.
Cloud based LLMs, translation, and TTS services would likely be faster and on average give better output but they require an internet connection, come with privacy concerns, and can be costly. So running these locally on the Raspberry Pi 5 is a nice alternative.
The speaking translator CLI is a basic command line translation utility that accepts text in English, translates it into one of 5 languages, then synthesizes the translated version to speech to play out of the speakers. It also supports keeping a history of translations to quickly and easily replay them without having to redo the translation. Perfect for practicing listening and pronunciation in another language.
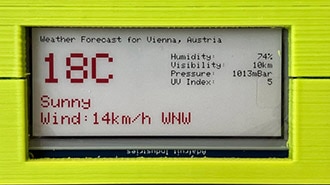
The weather and wardrobe assistant fetches weather from weather.gov, uses the current and forecast conditions to generate wardrobe suggestions, then translates the weather and wardrobe text into the specified language before synthesizing it to speech with the TTS model.
All of the experimentation was done on a Raspberry Pi 5 with 8gb RAM.
First get the latest release of Raspberry Pi OS installed on your Pi and update all of the built-in software with apt. If you are comfortable with the Raspberry Pi imaging and setup process, you can follow the steps listed here under the quick start prerequisites. If you'd like more details, a more thorough guide page can be found here.
If you are new to python or don't have experience with python virtual environments, see this guide for a good introduction.
Python Virtual Environment Usage on Raspberry Pi
By Carter Nelson
I used the Python virtual environment ~/venvs/translator_venv throughout this guide to install various Python dependencies into. You can do the same or choose a different name or location for it, but you must be sure to always activate your environment before installing dependencies or using the project scripts.
These commands will create and activate the virtual environment.
python -m venv ~/venvs/translator_venv
source ~/venvs/translator_venv/bin/activate
Install Blinka by following the automated install section on this guide page.
Install the proper gpio library based on whether you are using a Raspberry Pi 4, or 5.
Activate the same virtual environment created in step 1 if it is not already active.
To install the driver for the Adafruit Speaker Bonnet, follow the instructions on this setup page. Remember to use the same virtual environment you created and activated in the above step rather than the more generic one mentioned on the setup page. Once the installation is complete and you've rebooted the Pi, return here to continue.
The Adafruit Voice Bonnet is now discontinued, but if you have one it can be used for this project instead of the Speaker Bonnet. To install the driver for the Adafruit Voice Bonnet, follow the instruction this setup page. Remember to use the same virtual environment you created and activated in the above step rather than the more generic one mentioned.
Reboot the Pi to apply the settings set in the last step.
After the Pi comes back up from the reboot, check for the card by running the command below. You should see a card named sndrpigooglevoi for the Speaker Bonnet or seeed2micvoicec for the Voice Bonnet.
aplay -l
Take note of what card number the device has. You may need to use the card number to output audio from the device. In the picture above, the voicecard is card number 3, yours may be a different number.
You can use alsamixer to adjust the volume, don't forget to select the card with F6 or 's' key.
A gain of about 60% is plenty loud! The sliders marked speaker near the center control volume of output from the JST speaker connections. If you're using the Voice Bonnet, the slider marked headphone on the far-left controls the volume of output from the 3.5mm jack.
If you're using the Voice Bonnet Make sure the Audio On/Off switch is set to ON
With speakers attached to the JST speaker port, run
speaker-test -c2
You should hear white noise coming from speakers connected to the voice bonnet 3.5mm jack or JST speaker connection(s). If you do not hear anything, then you need to direct the audio output to the correct sound card by using the -D or --device argument. This is where you need the sound card number for the voice card that you can find with aplay -l. To specify the device use plughw:#,0 as the argument value, replacing the # with your card number. For example, when the voicecard is device number 3:
speaker-test -c2 -D plughw:3,0
Ollama is an inference engine, which is a tool for managing and running local LLMs. It also provides a Python library for interacting with local LLMs, allowing them to be integrated into projects. Ollama runs on different hardware and operating systems (OS) including Mac, Windows, and Linux.
Ollama supports many different models, but the majority of them are made for running on fancy GPUs and higher-powered computers than the Raspberry Pi. However, there are some that are small enough to work on the Raspberry Pi 5.
To install Ollama, download and run the shell script from ollama.com/download.
curl -fsSL https://ollama.com/install.sh | sh
On a Raspberry Pi 5, the process takes 3-5 minutes or longer for slower networks. During installation, it will print messages regarding the steps being taken and progress as well as a warning about not finding a GPU.
After it is finished, verify that that Ollama installed successfully by running the help command:
ollama -h
Many different models are available through a central hub hosted by Ollama simply by specifying a model name and version i.e. qwen3:0.6b in the code. The SmolLM3 model that this project uses are not hosted directly in that central Ollama hub. Not to worry though, the model is hosted in HuggingFace and it's easy to download the model and create a local instance with one additional step.
In the project files there is a SmolLM3.modelfile. This file contains a template that is used as the basis for the model interaction. It can be customized and fine-tuned based on different use-cases. For this project, it's a fairly standard chat "assistant" style template which supports short conversations with a user. The contents of this file are shown below along with a download project bundle button.
FROM hf.co/unsloth/SmolLM3-3B-128K-GGUF
TEMPLATE "
{{- $lastUserIdx := -1 }}
{{- range $i, $_ := .Messages }}
{{- if eq .Role "user" }}{{- $lastUserIdx = $i }}{{ end }}
{{- end -}}
<|im_start|>system
## Metadata

Knowledge Cutoff Date: June 2025
Today Date: {{ currentDate }}
Reasoning Mode: {{ if $.IsThinkSet }}{{ if $.Think }}/think{{ else }}/no_think{{ end }}{{ else }}/think{{ end }}

{{ if .System }}
## Custom Instructions

{{ .System }}


{{ end }}
{{- range $i, $_ := .Messages }}
{{- $last := eq (len (slice $.Messages $i)) 1 }}
{{- if eq .Role "user" }}<|im_start|>user
{{ .Content }}<|im_end|>
{{- else if eq .Role "assistant" }}<|im_start|>assistant
{{- if (and $.IsThinkSet (and .Thinking (or $last (gt $i $lastUserIdx)))) -}}
<think>{{ .Thinking }}</think>
{{- end }}
{{ .Content }}
{{- end }}
{{ if and (ne .Role "assistant") $last }}<|im_start|>assistant
{{- if and $.IsThinkSet (not $.Think) -}}
<think>

</think>

{{ end }}
{{ end }}
{{- end -}}
"
PARAMETER temperature 0.3
PARAMETER top_p 0.9To create the local instance of the model, run this command.
ollama create translator-smollm3 -f SmolLM3.modelfile
Within that command, translator-smollm3 is the name I assigned the local model instance to match the name on the venv used by the project. You can choose a different name if you want, just be sure to update the reference to it in the code as well.
The command takes a few minutes to complete depending on the network connection speed as it needs to download about 2gb of data. Once complete, you can confirm it worked by running this command.
ollama list
The local instance should appear in the list as in the screenshot below.
This project uses Piper for text to speech, Ollama Python bindings to interact with an LLM from Python code, and Requests to fetch weather data. All of them are included in the requirements.txt file that is in the project bundle.
Be sure to activate the project virtual environment if it isn't already active, then install all the requirements following command.
source ~/venvs/translator_venv/bin/activate

pip install -r requirements.txt
The requirements.txt file is embedded below.
ollama
piper-tts
requests
For more information about the Ollama Python bindings and a demo script to verify the installation worked see the Python Integration Page in the Local LLMs on Raspberry Pi guide.
Under the Trixie based Raspberry Pi OS, this warning is printed every time the Piper module is used. It can be safely ignored; the module still functions correctly.
In order to synthesize strings of text into wave audio files containing speech, Piper needs to download the voice files that will be used during synthesis. There are many different voices and languages available for download. This project uses 6 voices, one for each of the languages supported by SmolLM3: English, Spanish, French, Italian, Portuguese, and German.
Individual voice files can be downloaded with a command like:
python -m piper.download_voices it_IT-paola-medium
where it_IT-paola-medium can be any valid language file identifier. See the Piper voice sample page and look in the drop downs to find the full list of available language files.
For convenience the project bundle includes the file download_voices.sh which is a shell script that downloads all of the voices used by the project.
Run it with this command:
./download_voices.sh
Contents of download_voices.sh are embedded below.
# SPDX-FileCopyrightText: 2025 Tim Cocks for Adafruit Industries
#
# SPDX-License-Identifier: MIT
python -m piper.download_voices es_MX-claude-high
python -m piper.download_voices de_DE-kerstin-low
python -m piper.download_voices fr_FR-upmc-medium
python -m piper.download_voices it_IT-paola-medium
python -m piper.download_voices pt_BR-jeff-medium
python -m piper.download_voices en_US-amy-medium
To test that the Piper library and voices are installed and working correctly, run these commands.
python -m piper -m en_US-amy-medium -f test.wav "Hello world"
aplay test.wav
This will generate a wave audio file containing some test speech and then play it with aplay.
If you don't hear any output be sure that snd_rpi_googlevoicehat_soundcard for the Speaker Bonnet or seeed-2mic-voicecard for the Voice Bonnet is selected as the audio output device by right clicking the speaker icon in the upper right corner of the desktop and selecting it from the list.
I made this basic translator command line tool as a precursor to the Weather & Wardrobe Assistant on the next page. This one is a little less complex since it doesn't deal with data from API. It tends to run faster as well because it's only a single LLM operation, and it's typically translating and synthesizing less text overall.
The project is intended experimentation and demonstration of using different local edge models together on the Raspberry Pi 5. Translation is not always perfect. As with all LLMs, there are some hallucinations and the occasional ignoring of instructions in the prompt leading to excessive or incorrect output.
This script contains a CLI or Command Line Interface utility for translating and speaking words or short phrases. Run the Python script as a command and pass the word or phrase to translate as an argument.
The utility has the following options:
-h or --help: Print the help text with list of options and command info.
-l or --language: The language to translate to. The valid options are es, de, fr, it, and pt.
-r or --replay: Replay a previous translation speech wave file. Defaults to the most recent one, pass the history number to specify a certain one.
-t or --history: Prints a numbered list of prior translations. The numbers shown in this list can be used with the replay option to play a specific translation.
The translate.py script is embedded below.
# SPDX-FileCopyrightText: 2025 Tim Cocks for Adafruit Industries
#
# SPDX-License-Identifier: MIT
# pylint: disable=line-too-long
import argparse
import json
import os
import sys
from pathlib import Path
import wave
from ollama import chat
from ollama import ChatResponse
from piper import PiperVoice

translation_wavs_dir = Path("translation_wavs")

if not translation_wavs_dir.exists():
    translation_wavs_dir.mkdir()

history_file = Path("history.json")
if not history_file.exists():
    history_obj = {"history": []}
    with open(history_file, "w") as f:
        f.write(json.dumps(history_obj))

with open(history_file, "r") as f:
    history_obj = json.loads(f.read())


def save_history():
    with open(history_file, "w") as open_history_file:
        open_history_file.write(json.dumps(history_obj))


def get_translation_filepath(text):
    filename = text.replace(" ", "_")
    return str(translation_wavs_dir / Path(filename + ".wav"))


def create_history_entry(text, translated_text, language_choice):
    new_entry = {
        "input_text": text,
        "translation_file": get_translation_filepath(text),
        "translated_text": translated_text,
        "language": language_choice,
    }
    return new_entry


def add_to_history(entry_obj):
    history_obj["history"].append(entry_obj)
    save_history()


def play_translation_wav(entry_obj):
    print(f"{entry_obj['language']}: {entry_obj['translated_text']}")
    os.system(f"aplay --disable-softvol {entry_obj['translation_file']}")


parser = argparse.ArgumentParser(
    prog="translate.py",
    description="Translates a word or phrase from english to another language and then speak the translation.",
    epilog="Made with: SmolLM3 & Piper TTS.",
)

language_name_map = {
    "es": "spanish",
    "de": "german",
    "fr": "french",
    "it": "italian",
    "pt": "portuguese",
}

language_voice_map = {
    "es": "es_MX-claude-high.onnx",
    "de": "de_DE-kerstin-low.onnx",
    "fr": "fr_FR-upmc-medium.onnx",
    "it": "it_IT-paola-medium.onnx",
    "pt": "pt_BR-jeff-medium.onnx",
}

parser.add_argument("input", nargs="?")
parser.add_argument("-l", "--language", default="es")
parser.add_argument("-r", "--replay", action="store_true")
parser.add_argument("-t", "--history", action="store_true")
args = parser.parse_args()
input_str = args.input

if args.replay:
    replay_num = None
    try:
        replay_num = int(args.input)
    except (ValueError, TypeError):
        if args.input is not None:
            print("Replay number must be an integer.")
            sys.exit()

    if replay_num is None:
        chosen_entry = history_obj["history"][-1]
    else:
        index = len(history_obj["history"]) - replay_num
        chosen_entry = history_obj["history"][index]

    play_translation_wav(chosen_entry)
    sys.exit()

if args.history:
    for i, entry in enumerate(reversed(history_obj["history"])):
        print(
            f"{i+1}: {entry['language']} - {entry['input_text']} - {entry['translated_text']}"
        )
    sys.exit()


if args.language not in language_name_map.keys(): # pylint: disable=consider-iterating-dictionary
    raise ValueError(
        f"Invalid language {args.language}. Valid languages are {language_name_map.keys()}"
    )

language = language_name_map[args.language]

for history_entry in history_obj["history"]:
    if (
        history_entry["input_text"].lower() == input_str.lower()
        and history_entry["language"] == args.language
    ):
        play_translation_wav(history_entry)
        sys.exit()

response: ChatResponse = chat(
    model="translator-smollm3",
    messages=[
        {
            "role": "system",
            "content": "You are a translation assistant. The user is going to give you a word or short phrase in english, "
            f"please translate it to {language}. Output only the {language} translation of the input. Do not output "
            "explanations, notes, or anything else. If there is not an exact literal translation, just output "
            "the best fitting alternate word or phrase that you can. Do not explain anything, only output "
            "the translation.",
        },
        {
            "role": "user",
            "content": f"{input_str}",
        },
    ],
)

translation = response["message"]["content"]
# print(translation)
if "\n" in translation:
    translation = translation.split("\n")[0]
    if len(translation) == 0:
        parts = translation.split("\n")
        for part in parts:
            if len(part) > 0:
                translation = part

history_entry = create_history_entry(input_str, translation, args.language)

voice = PiperVoice.load(language_voice_map[args.language])
with wave.open(history_entry["translation_file"], "wb") as wav_file:
    voice.synthesize_wav(translation, wav_file)

add_to_history(history_entry)
play_translation_wav(history_entry)
This project is an assistant that will read the weather and make a suggestion for wardrobe based on the forecast conditions. Thanks to multi-lingual support in both SmolLM3 and Piper TTS, the assistant can translate the weather and wardrobe message from English into 5 other languages: French, German, Portuguese, Italian, and Spanish.
Generating the wardrobe suggestion, translating the text, and synthesizing it to speech all occurs locally on the Raspberry Pi without relying on any cloud services. During testing, the full process took an average of 2-3 minutes. Perhaps not fast enough to be done on demand at the user's request, but pretty quick considering the tasks involved and Pi 5 hardware.
The project is intended experimentation and demonstration of using different local edge models together on the Raspberry Pi 5. Translation and wardrobe suggestions are not always perfect. As with all LLMs, there are some hallucinations and the occasional ignoring of instructions in the prompt leading to excessive or incorrect output.
This script fetches the current conditions and forecast from weather.gov for a given set of location points. After fetching the data, the script first sends it to a SmolLM3 instance that is tasked with suggesting appropriate wardrobe items based on the weather conditions. Next it combines the wardrobe suggestion with the forecast text and sends them to another SmolLM3 instance, this time to translate the passage of text into the chosen language. Once the translation is complete, the resulting text is passed to Piper TTS to synthesize it as speech into a wave audio file. If you want to keep using this project and get updated weather information all the time, you could setup a cron job to run this script once or a few times a day based on your schedule.
# SPDX-FileCopyrightText: 2025 Tim Cocks for Adafruit Industries
#
# SPDX-License-Identifier: MIT
import argparse
import json
from pathlib import Path
import os
import shutil
import wave
import requests
from ollama import chat
from ollama import ChatResponse
from piper import PiperVoice

# pylint: disable=line-too-long
parser = argparse.ArgumentParser(
    prog="python generate_translated_weather_audio.py",
    description="Multi-Lingual Weather & Wardrobe Assistant - "
    "Fetches weather conditions from weather.gov for a given set of location points. "
    "Generates a wardrobe suggestion based on the weather conditions. "
    "Translates the weather and wardrobe suggestion into one of 5 other languages. "
    "Synthesizes a wave audio file narrating the weather and wardrobe info in "
    "the specified language.",
    epilog="Made with: SmolLM3 & Piper1-gpl",
)
parser.add_argument(
    "-l",
    "--language",
    default="es",
    help="The language to translate into. One of (de, es, fr, it, pt). Default is es.",
)
parser.add_argument(
    "-p",
    "--location-points",
    default="36,33",
    help="The weather.gov API location points to get weather for. Default is 36,33. "
    "Visit https://api.weather.gov/points/{lat},{lon} to find location points "
    "for GPS coordinates",
)
parser.add_argument(
    "-e",
    "--period",
    default="current",
    help="The weather period to consider, current or next. Default is current.",
)
parser.add_argument(
    "-c",
    "--cached",
    action="store_true",
    help="Use the cached weather data from forecast.json instead of fetching from the server.",
)
args = parser.parse_args()
language_name_map = {
    "es": "spanish",
    "de": "german",
    "fr": "french",
    "it": "italian",
    "pt": "portuguese",
}

language_voice_map = {
    "es": "es_MX-claude-high.onnx",
    "de": "de_DE-kerstin-low.onnx",
    "fr": "fr_FR-upmc-medium.onnx",
    "it": "it_IT-paola-medium.onnx",
    "pt": "pt_BR-jeff-medium.onnx",
}
if args.language not in language_name_map.keys():  # pylint: disable=consider-iterating-dictionary
    raise ValueError(
        f"Invalid language {args.language}. Valid languages are {language_name_map.keys()}"
    )

if args.period.lower() not in {"current", "cur", "next"}:
    raise ValueError(
        f"Invalid period {args.period}. Valid periods are 'current', 'next'"
    )

replacements = {"mph": "miles per hour"}

# latlng_lookup_url = "https://api.weather.gov/points/{lat},{lon}"
location_points = args.location_points

if not args.cached:
    weather_data = requests.get(
        f"https://api.weather.gov/gridpoints/TOP/{location_points}/forecast", timeout=20
    ).json()
    print("Fetched weather...")

    with open("forecast.json", "w") as f:
        json.dump(weather_data, f)
else:
    weather_data = json.loads(Path("forecast.json").read_text())
    print("Read cached weather...")
period_index = 0
if args.period == "next":
    period_index = 1
elif args.period in {"cur", "current"}:
    period_index = 0

period = weather_data["properties"]["periods"][period_index]

english_weather = (
    f'Current Temperature is {period["temperature"]}{period["temperatureUnit"]}. '
)
english_weather += f'{period["name"]} {period["detailedForecast"]}'

for key, replacement in replacements.items():
    english_weather = english_weather.replace(key, replacement)

print(f"english_weather: {english_weather}")

print("Generating wardrobe suggestion...")
response: ChatResponse = chat(
    model="translator-smollm3",
    messages=[
        {
            "role": "system",
            "content": "You are a wardrobe assistant. Your job is to suggest some appropriate "
            "clothes attire for a person to wear based on the weather. You can include clothing items "
            "and accessories that are appropriate for the specified weather conditions. "
            "Use positive and re-affirming language. Do not output any explanations, "
            "only output the wardrobe suggestion. Do not summarize the weather."
            "The wardrobe suggestion output should be no more than 2 sentences.",
        },
        {
            "role": "user",
            "content": f"{english_weather}",
        },
    ],
)

print(response["message"]["content"])
# combine weather and wardrobe suggestion
english_weather += " " + response["message"]["content"]

print("Translating weather & wardrobe...")

language = language_name_map[args.language]
response: ChatResponse = chat(
    model="translator-smollm3",
    messages=[
        {
            "role": "system",
            "content": "You are a translation assistant. The user is going to give you a short passage in english, "
            f"please translate it to {language}. Output only the {language} translation of the input. "
            "Do not output explanations, notes, or anything else. If there is not an exact literal translation, "
            "just output the best fitting alternate word or phrase that you can. Do not explain anything, "
            f"only output the translation. All output should be in {language}",
        },
        {
            "role": "user",
            "content": f"{english_weather}",
        },
    ],
)
translated_weather = response["message"]["content"]
print(translated_weather)

print("Generating audio...")

shutil.rmtree("sound_files", ignore_errors=True)
os.mkdir("sound_files")

voice = PiperVoice.load(language_voice_map[args.language])
with wave.open("sound_files/weather_and_wardrobe.wav", "wb") as wav_file:
    voice.synthesize_wav(translated_weather, wav_file)

print("Audio generation complete...")
To run it, be sure to activate the project virtual environment and then use this command.
python make_weather_wardrobe_audio.py
By default, it will fetch weather for New York and translates into Spanish. There are a number of arguments that can be used to change its behavior:
-l or --language: Specify a language to translate to, or en to stay in English. The valid options are es, de, fr, it, pt, and en.
-p or --location-points: A pair of X, NWS location points. Must be separated by a comma, without spaces. For example, 36,33. See the NWS docs for more info about finding appropriate grid points.
-e or --period: Which weather period to use. Valid values are current or next.
-c or --cached: Use the cached copy of forecast data instead of fetching from NWS. Use this if you're translating weather from the same location multiple times into different languages. It prevents the script from continuing to fetch data from the NWS API several times when it won't have changed.
Once the translation is complete and synthesized into the wave file, you can play it using the following command.
aplay sound_files/weather_and_wardrobe.wav
A demonstration of the Weather & Wardrobe Assistant is featured in the YouTube shorts video embedded below.