Intro to ROS Part 7: Custom Interfaces
2025-11-06 | By ShawnHymel
Single Board Computers Raspberry Pi SBC
In previous tutorials, we built ROS 2 nodes that exchanged data using built-in interfaces for topics and services. While these built-in interfaces are convenient, real-world robotics applications often demand custom data formats. In this episode, we’ll go one step further by creating and using custom interfaces in both Python and C++. You’ll learn how to define your own message and service types and use them in publisher/subscriber and client/server architectures. Let’s dive in!
The Docker image and code for this series can be found here: https://github.com/ShawnHymel/introduction-to-ros
Why Custom Interfaces?
ROS 2 defines strict formats for communication between nodes through messages for topics and services. These formats, called interfaces, ensure that both the sender and receiver know exactly what kind of data to send or receive. While ROS 2 comes with a large set of predefined interfaces, many applications require something more tailored. For example, you might want to transmit raw accelerometer data or trigger a server to return an array of navigation points.
By creating your own .msg and .srv files, you gain precise control over the structure of the data shared between your nodes. Plus, these interfaces can be shared across languages, making them especially powerful in heterogeneous systems.
Setting Up a Custom Interface Package
The best practice is to keep interfaces in their own package. This ensures that your message definitions are reusable and can be imported by both Python and C++ packages. Start by creating a new package using ament_cmake:
ros2 pkg create --build-type ament_cmake my_interfaces
Next, delete the include/ and src/ directories, as we won’t be compiling any executables in this package. Instead, create msg/ and srv/ directories to hold your custom interfaces. For example, create a message file at my_interfaces/msg/Accelerometer.msg with the following contents:
float64 x
float64 y
float64 z
This message can represent raw data from a 3-axis accelerometer.
In that package, update package.xml and CMakeLists.txt to include the necessary dependencies:
package.xml
Just below the “<buildtool_depend>ament_cmake</buildtool_depend>” line add:
<buildtool_depend>rosidl_default_generators</buildtool_depend>
<exec_depend>rosidl_default_runtime</exec_depend>
<member_of_group>rosidl_interface_packages</member_of_group>
CMakeLists.txt
Update the file as follows:
find_package(ament_cmake REQUIRED)
find_package(rosidl_default_generators REQUIRED)

…

rosidl_generate_interfaces(${PROJECT_NAME}
  "msg/Accelerometer.msg"
)

ament_export_dependencies(rosidl_default_runtime)
Build the package:
colcon build --packages-select my_interfaces
You’ll see the generated C++ headers and Python modules in the install/ directory.
Update IntelliSense in VS Code
If you would like IntelliSense in VS Code to pick up your newly installed interfaces, add these lines to .vscode/settings.json for Python:
"python.analysis.extraPaths": [
       "/opt/ros/jazzy/lib/python3.12/site-packages",
       "${workspaceFolder}/install/my_interfaces/lib/python3.12/site-packages"
],
For C++ IntelliSense, add the following to .vscode/c_cpp_properties.json:
"${workspaceFolder}/install/my_interfaces/include/**"
Using Custom Messages in a Python Publisher
Now, let’s write a publisher node in Python that sends dummy accelerometer data using our new interface. Inside your Python package, copy and modify the minimal publisher example. Rename the file to acc_publisher.py. Replace the message type with our custom one:
import rclpy
from rclpy.executors import ExternalShutdownException
from rclpy.node import Node

from my_interfaces.msg import Accelerometer

class AccPublisher(Node):
    """Publisher example that periodically sends out dummy accelerometer data"""

    def __init__(self):
        """Constructor"""

        # Call the Node class constructor with the node name
        super().__init__('acc_publisher')

        # Create a publisher object
        self._publisher = self.create_publisher(Accelerometer, 'my_acc', 10)

        # Periodically call method
        self._timer = self.create_timer(0.5, self._timer_callback)

    def _timer_callback(self):
        """Publishes a simple message to topic"""

        # Fill out String message
        msg = Accelerometer()
        msg.x = 0.5
        msg.y = 0.1
        msg.z = -9.8

        # Publish message to topic
        self._publisher.publish(msg)
        self.get_logger().info(f"Publishing: {msg}")

def main(args=None):
    """Main entrypoint"""

    # Initialize and run node
    try:
        rclpy.init()
        node = AccPublisher()
        rclpy.spin(node)

    # Catch ctrl+c or shutdown request
    except (KeyboardInterrupt, ExternalShutdownException):
        pass

    # Destroy node (now) and gracefully exit
    finally:
        if node is not None:
            node.destroy_node()
        if rclpy.ok():
            rclpy.shutdown()

if __name__ == '__main__':
    main()
Update package.xml to include the new interface dependency:
<depend>rclpy</depend>
<depend>example_interfaces</depend>
<depend>my_interfaces</depend>
Add the executable to setup.py:
"acc_publisher = my_py_pkg.acc_publisher:main",
Build the package:
colcon build --packages-select my_py_pkg
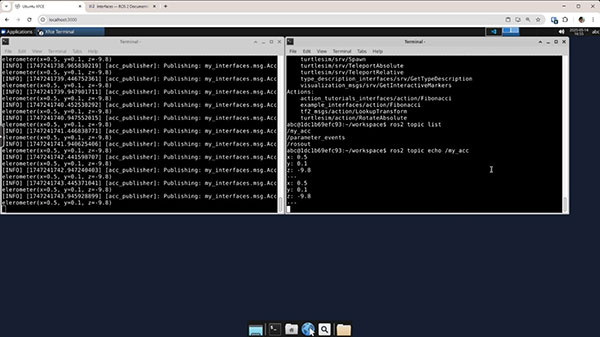
To run the publisher, run in one terminal:
cd /config/workspace
source install/setup.bash
ros2 run my_py_pkg acc_publisher
In another terminal, echo the messages:
cd /config/workspace
source install/setup.bash
ros2 topic list
ros2 topic echo /my_acc
Using Custom Messages in a C++ Subscriber
Next, we’ll subscribe to this topic using a C++ node. Copy your previous minimal subscriber, rename the file to acc_subscriber.cpp, and update the code to use our new interface:
#include "rclcpp/rclcpp.hpp"
#include "my_interfaces/msg/accelerometer.hpp"

/**
 * Subscriber example that prints messages to the console
 */
class AccSubscriber : public rclcpp::Node
{
public:
/**
   * Constructor (call Node class constructor with node name)
   */
  AccSubscriber() : Node("acc_subscriber")
  {
    // Create a subscription object
    subscription_ = this->create_subscription<my_interfaces::msg::Accelerometer>(
      "my_acc",
      10,
      std::bind(
        &AccSubscriber::listener_callback,
        this,
        std::placeholders::_1));
  }
private:
  /**
   * Prints message to the console
   */
  void listener_callback(const my_interfaces::msg::Accelerometer & msg)
  {
    RCLCPP_INFO(
      this->get_logger(),
      "Accelerometer: x=%.2f, y=%.2f, z=%.2f",
      msg.x,
      msg.y,
      msg.z);
  }

  // Declare member variables
  rclcpp::Subscription<my_interfaces::msg::Accelerometer>::SharedPtr
    subscription_;
};

/**
 * Main entrypoint
 */
int main(int argc, char * argv[])
{
  // Initialize ROS 2
  rclcpp::init(argc, argv);

  // Initialize and run node
  auto node = std::make_shared<AccSubscriber>();
  rclcpp::spin(node);

  // Cleanup
  rclcpp::shutdown();

  return 0;
}
Add the interface to the dependency list in package.xml:
<depend>rclcpp</depend>
<depend>example_interfaces</depend>
<depend>my_interfaces</depend>
Update the dependency list and add the executable to CMakeLists.txt:
# find dependencies
find_package(ament_cmake REQUIRED)
find_package(rclcpp REQUIRED)
find_package(example_interfaces REQUIRED)
find_package(my_interfaces REQUIRED)

…

# Define acc_subscriber target and link libraries
add_executable(acc_subscriber src/acc_subscriber.cpp)
ament_target_dependencies(acc_subscriber rclcpp my_interfaces)

# Install binaries to specific folder
install(TARGETS
 minimal_publisher
 minimal_subscriber
 minimal_server
 minimal_client
 acc_subscriber
 DESTINATION lib/${PROJECT_NAME})
Build the package:
colcon build --packages-select my_cpp_pkg
In a terminal, run the publisher:
cd /config/workspace
source install/setup.bash
ros2 run my_py_pkg acc_publisher
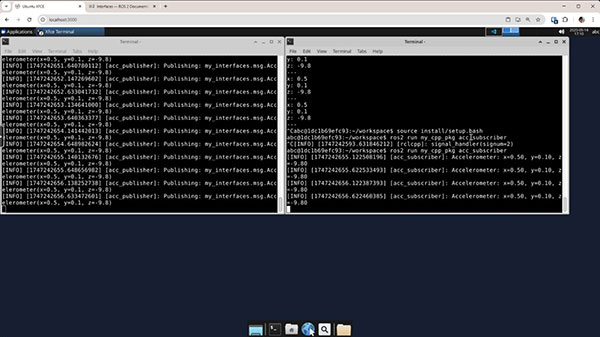
In another terminal, run the subscriber:
cd /config/workspace
source install/setup.bash
ros2 run my_cpp_pkg acc_subscriber
With both the publisher and subscriber running, you should see values being transmitted and received using your custom message.
Note that this is just an example. ROS 2 has a built-in accelerometer interface (geometry_msgs/msg/Accel) that you should probably use if you need this kind of data.
Creating a Custom Service Interface
Now let’s build a service that returns an array of random geometry points. First, define a new .srv file: my_interfaces/srv/TriggerPoints.srv:
uint16 num_points
---
bool success
geometry_msgs/Point[] points
This service lets a client request a certain number of points, which the server returns.
Update package.xml:
<member_of_group>rosidl_interface_packages</member_of_group>
<depend>geometry_msgs</depend>
Update CMakeLists.txt to add geometry_msgs as a dependency:
find_package(rosidl_default_generators REQUIRED)
find_package(geometry_msgs REQUIRED)

…

rosidl_generate_interfaces(${PROJECT_NAME}
 "msg/Accelerometer.msg"
 "srv/TriggerPoints.srv"
 DEPENDENCIES geometry_msgs
)
Build the interface package:
colcon build --packages-select my_interfaces
Python Server Using the Custom Service
In your Python package (my_py_pkg), copy minimal_server.py to trigger_points_server.py and modify it to generate random points based on the request. In the callback, create geometry_msgs/Point objects and append them to the response list.
import random

import rclpy
from rclpy.executors import ExternalShutdownException
from rclpy.node import Node

from geometry_msgs.msg import Point
from my_interfaces.srv import TriggerPoints

class TriggerPointsServer(Node):
    """Server that responds with array of random points"""

    def __init__(self):
        """Constructor"""

        # Call the Node class constructor with the node name
        super().__init__('trigger_points_server')

        # Create a service object
        self._srv = self.create_service(
            TriggerPoints,
            'trigger_points',
            self._server_callback
        )

    def _server_callback(self, req, resp):
        """Responds with array of random floats"""

        # Log request
        self.get_logger().info(f"Received request: num_points={req.num_points}")

        # Set success based on number of points
        if req.num_points > 0:
            resp.success = True
        else:
            resp.success = False

        # Create num_points number of random points
        resp.points = []
        for _ in range(req.num_points):
            point = Point()
            point.x = random.uniform(-1.0, 1.0)
            point.y = random.uniform(-1.0, 1.0)
            point.z = random.uniform(-1.0, 1.0)
            resp.points.append(point)

        return resp

def main(args=None):
    """Main entrypoint"""

    # Initialize and run node
    try:
        rclpy.init()
        node = TriggerPointsServer()
        rclpy.spin(node)
    except (KeyboardInterrupt, ExternalShutdownException):
        pass
    finally:
        if node is not None:
            node.destroy_node()
        if rclpy.ok():
            rclpy.shutdown()

if __name__ == '__main__':
    main()
No need to update package.xml, as it already contains our interface as a dependency. However, you do need to add the executable to setup.py:
"trigger_points_server = my_py_pkg.trigger_points_server:main",
Build the package:
colcon build --packages-select my_py_pkg
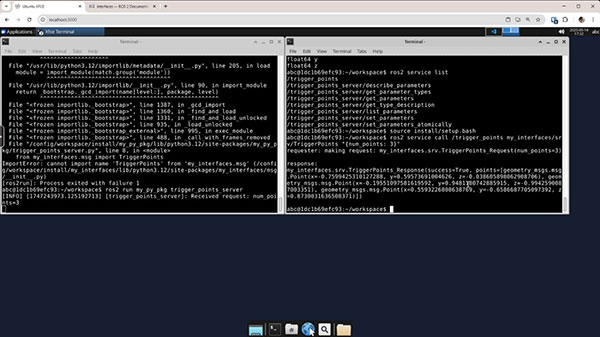
In one terminal, run the server:
cd /config/workspace
source install/setup.bash
ros2 run my_py_pkg trigger_points_server
In another terminal, perform a test call to the server:
ros2 service list
service call /trigger_points my_interfaces/srv/TriggerPoints "{num_points: 3}"
C++ Client for the Custom Service
To consume this service in C++, we need to create a client that sends a random number of points on each request. In my_cpp_pkg, copy minimal_client.cpp to trigger_points_client.cpp and modify:
#include <random>

#include "rclcpp/rclcpp.hpp"

#include "geometry_msgs/msg/point.hpp"
#include "my_interfaces/srv/trigger_points.hpp"

/**
 * Client example that periodically calls the server
 */
class TriggerPointsClient : public rclcpp::Node
{
public:
 /**
   * Constructor
   */
  TriggerPointsClient() : Node("trigger_points_client")
  {
    // Create a client object
    client_ = this->create_client<my_interfaces::srv::TriggerPoints>(
      "trigger_points");/

    // Wait for service
    while (!client_->wait_for_service(std::chrono::seconds(2)))
    {
      RCLCPP_WARN(this->get_logger(), "Waiting for service...");
    }

    // Seed random number generator with current time
    std::srand(std::time(nullptr));

    // Periodically call method
    timer_ = this->create_wall_timer(
      std::chrono::milliseconds(2000),
      std::bind(&TriggerPointsClient::timer_callback, this));
  }
private:
 /**
   * Send request to server
   */
  void timer_callback()
  {
    // Fill out request message with random number of requested points
    auto req = std::make_shared<my_interfaces::srv::TriggerPoints::Request>();
    req->num_points = std::rand() % 11;

    // Send request to server and set callback
    client_->async_send_request(
      req,
      std::bind(
        &TriggerPointsClient::response_callback,
        this,
        std::placeholders::_1));
  }

  /**
   * Log result when received from server
   */
  void response_callback(
    rclcpp::Client<my_interfaces::srv::TriggerPoints>::SharedFuture future)
  {
    auto resp = future.get();
    RCLCPP_INFO(
      this->get_logger(),
      "Success: %s",
      resp->success ? "true" : "false");
    for (const auto & point : resp->points)
    {
      RCLCPP_INFO(
        this->get_logger(),
        "Point: x=%.2f, y=%.2f, z=%.2f",
        point.x,
        point.y,
        point.z);
    }
  }

  // Declare member variables
  rclcpp::Client<my_interfaces::srv::TriggerPoints>::SharedPtr client_;
  rclcpp::TimerBase::SharedPtr timer_;
};

/**
 * Main entrypoint
 */
int main(int argc, char * argv[])
{
  rclcpp::init(argc, argv);
  auto node = std::make_shared<TriggerPointsClient>();
  rclcpp::spin(node);
  rclcpp::shutdown();

  return 0;
}
Our package.xml has already been updated with the interface dependency. However, we still need to update CMakeLists with the executable:
# Define trigger_points_client target and link libraries
add_executable(trigger_points_client src/trigger_points_client.cpp)
ament_target_dependencies(trigger_points_client rclcpp my_interfaces)

# Install binaries to specific folder
install(TARGETS
 minimal_publisher
 minimal_subscriber
 minimal_server
 minimal_client
 acc_subscriber
 trigger_points_client
 DESTINATION lib/${PROJECT_NAME})
Build the package:
colcon build --packages-select my_cpp_pkg
Run in one terminal (if not already running):
cd /config/workspace
source install/setup.bash
ros2 run my_py_pkg trigger_points_server
Run in another terminal:
cd /config/workspace
source install/setup.bash
ros2 run my_cpp_pkg trigger_points_client
You should see new random points being generated and displayed on each call.

Wrapping Up
In this tutorial, we showed how to define and use custom message and service interfaces in ROS 2. These custom interfaces give you full control over the structure of the data flowing through your robotic system. You learned how to structure an interface-only package, integrate it into Python and C++ projects, and connect nodes across languages using your new interfaces.
By mastering custom interfaces, you unlock the full flexibility of ROS 2 communication models and can design software that precisely fits your application’s needs. In the next tutorial, we’ll see how parameters can be used to configure nodes at launch.
Stay tuned!


